Учебник Bethesda Оптимизация
![]() Статья не закончена!
Статья не закончена!
| Учебник Bethesda Оптимизация | |
|---|---|
| Серия Дизайн Уровней, глава 7 | |
| Вернуться в Учебный центр | |
| Следующий учебник | |
| Примеры плагинов: | |
| Начальный | Завершенный |
| Прилагаемый видео-учебник | |
Содержание
Обзор
Эта глава проведет вас через процесс оптимизации подземелья для повышения производительности.
Вы узнаете:
- Советы по достижению наилучшей производительности
- Инструменты доступные для оптимизации
- Как размещать маркеры комнат и порталы
Что есть оптимизация?
Зачастую визуализируемые в играх объекты, продолжают тратить драгоценную производительность, когда они не нужны. Например, если игрок находится внутри комнаты, у которой со всех сторон стены, он не увидит что-либо за стенами. Нет необходимости в визуализации объектов, находящимися за стенами. Однако, по-умолчанию, эти объекты могут быть визуализированы. Смотри Рис. 7.1 для примера. Хоть и выбраковка таких объектов может казаться очевидной для нас, иногда игровым движкам приходится принимать нелегкое решение о том, что должно быть прорисовано.
Для того чтобы помочь игре узнать о том, что нам не нужно визуализировать объекты вне стен, у нас в распоряжении есть специальные инструменты, доступные для оптимизации комнаты. Благодаря этим инструментам игра может принимать лучшие решения о том, что визуализировать, а что выбраковывать. Доступные инструменты - это Порталы (Portals), маркеры комнат (Room Markers), Multibounds, и Occlusion Planes.
Не всегда необходимо делать ручную оптимизацию - некоторые пространства очень простые и потребляют не много ресурсов. Запомните, что игровое пространство может хорошо работать на вашей машине, и при этом работать очень плохо на другой машине, с другой конфигурацией железа. Этот учебник постарается ознакомить вас и дать несколько практических примеров в том, как сделать, чтобы ваш мод хорошо работал на максимально возможном числе машин.
Сборка для производительности по передовому опыту
There are a number of guidelines you can keep in mind throughout building to avoid performance problems. Paying attention to these best practices will make your dungeon much easier to optimize.
- Watch your object count
Put simply, the object count is the number of "objects" rendered at a given time in the game. Some complex references may actually be made up of several objects, therefore the number of references is not actually a good indicator of your actual object count. Still, it's a good rule of thumb to keep the number of references down in a space for the sake of performance.
- Avoid Long Sight Lines
Rendering depends largely on the player's line of sight, or how far the player can see before her view is blocked. The longer the line of sight in a space, the more objects the game needs to render. It doesn't matter if there is a door or a wall blocking the way, whatever is in that line will render. Manual optimization will help avoid the worst instances, but it's a good idea to avoid long sight-lines in the first place.
There is a line of sight issue in Lokir's Tomb that could potentially cause performance problems if left unchecked. From the entry room you can see into the next two rooms causing the game to render a lot of objects as seen in Fig 7.2.
We can fix this by adding a staircase to the large hallway section leading into the cave. This will elevate the entire cave area, helping us block line of sight. Because we have elevated an entire room, we'll have to adjust the navmesh to match as well.
- Locate the "NorHallBg1way01" reference closest to the dungeon entrance.
- Ctrl+F to replace this with a "NorHallBg1wayStairs256" object
- Make sure Markers are toggled on ("M" hotkey)
- Adjust the dungeon and navmesh to snap with the new stair
- Check carefully for any seams introduced by the adjustment.
- Check the number of lights
The number of lights in a space affects performance as well. Try not let any object be lit by more than two lights. You can get a feel for how many references a light affects by toggling the "L" hotkey. You can also look for lighting issues in a space by right clicking in the render window and selecting "Render Window Properties". Go to the "Shaders" tab and check the box that says "# of lights". Fig 7.3 shows an example space that has too many lights. The colors represent the number of lights hitting a each reference. Green represents an unlit piece and red means there are too many lights on a piece and performance issues are likely. It is good practice to make sure nothing shows up red when lighting your dungeon.
- Observe Framerate w/FRAPS
FRAPS is a piece of software that allows you to capture video and screenshots in game, but it also shows the framerate as it is running. It is a good idea to run through your space with FRAPS running to check your framerate while trying to look in all directions. A good rule of thumb is to try and stay consistently above 30 frames per second. If your framerate dips at any point, there could be an object count issue in your field of view. Download FRAPS here.
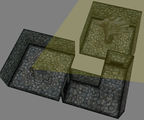
Fig. 7.1: Without Manual Optimization, the Statue will render because it is within the player's yellow view cone, even though the player cannot actually see it.
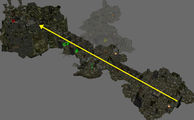
Fig. 7.2: Lokir's Tomb features a long, unbroken sight-line.
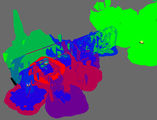
Fig. 7.3: References with red/purple shading have too many lights hitting them.


Маркеры комнат и порталы

Маркеры комнат это прстые фигуры, которые вы можете создать для определения конкретной зоны, как комнаты. По сути, комнаты это как сборщики объектов. При выбраковке, визуализатор будет рассматривать все внутри другой комнаты, как невидимое, экономя драгоценную вычислительную мощность компьютера.
Маркеры комнат
Маркер комнаты (англ. Room Marker), иногда называемый граница комнаты (англ. Roombound), это бокс, для группировки объектов вместе, позволяющий Creation Engine визуализировать или выбраковывать их как группу. Например, мы можем создать большой маркер комнаты, который окружает всю комнату. По-умолчанию, объекты внутри этого маркера будут нормально визуализироваться - но как только вы выходите из него, каждый объект, охваченный маркером комнаты будет выбракован и станет невидимым.
Боксы "A" и "B" на Рис. 7.4 представляют собой два маркера комнат. Черная точка это игрок, и полу-прозрачный треугольник показывает поле зрения игрока. С помощью всего лишь этих маркеров комнат, игрок будет видеть только ссылки (объекты) внутри комнаты "A". Однако, спасибо порталам, благодаря которым мы можем логично соединять маркеры комнат между собой.
Порталы
Портал (англ. Portal) это своего рода дверной проем от одного маркера комнаты в другой. Без порталов, игрок на Рис. 7.4 увидит все ссылки внутри комнаты "A", но не увидит ничего внутри комнаты "B". Однако на этой диаграмме два портала: портал "a" и портал "b".
Поскольку усеченная пирамида поля зрения игрока включает некоторые объекты или даже все в портале "a", содержимое обеих комнат "A" и "B" будет визуализировано. (Положим, что "a" конечно же привязана к обоим комнатам "A" и "B". Подробнее позже.)
Обратите внимание что игрок не может видеть никакую часть портала "b". Это обозначает что любая комната, присоединенная к этому порталу (ни одна из показанных) будет выбраковываться.
Optimization Workflow
Manual optimization with Room Markers and Portals can be difficult thing to understand. Let's go through the process with Lokir's Tomb to see it in action.
Step 1: Creating Room Markers
Before we begin, there are a couple quick set-up steps:
- Break the long sight-line as mentioned above if you haven't already (Fig 7.2)
- Toggle Snap-to-Grid On (Q hotkey or Файл:Buttongridsnapping.jpg)
- On the main toolbar, click: View > Show/Hide Window
- Check "Portals and Rooms". NOTE: "Markers" must be checked as well
Lokirs Tomb is basically made up of five distinct areas. We'll use a room marker to define each of these areas in a way the Creation Engine can easily understand. We'll begin with the first room, and then repeat to create the rest.
- Ctrl+click to select wall pieces from each side of the room
- Click the "Create Room" button on the Main Toolbar: Файл:Toolbar Button Cubic Room.jpg
- Note that our new Room Marker encompasses all the objects in our selection.
- Manually Scale your new Room Marker to include any stray pieces, as in Fig 7.5b.
- Repeat this process to create a total of five rooms, as seen in Fig 7.5c-e.
- Optionally, you can duplicate and scale your existing Room Marker by hand. It's up to you, as long as you achieve the same result.

It's possible to go overboard here. Each Portal the camera frustum hits involves a calculation cost, meaning that too many Rooms/Portals can actually cause a space to run slower than without them. It's a good rule of thumb to avoid situations where the line-of-sight will penetrate more than 3-5 portals.
Some of your rooms may overlap or be separated by small gaps, as in Fig 7.5d, depending on how you created them. You can use non-uniform scaling (covered in an earlier tutorial) to minimize these errors. Strive to line Rooms up at the most narrow possible points, such as doorways. Further information on working with primitives can be found here. The Creation Kit will attempt to correct minor errors when we link these rooms together later, but it's best to strive for good snapping now, as in Fig 7.5e.
Try running the game now. You'll notice that things don't look right; each room renders on its own while the player is within. You'll see gaps to the void anywhere another Room Marker begins. We'll install portals in the next step, which will allow the Creation Engine to render multiple Rooms at once.
-
Perfectly aligned room edges are important, or you can end up with very small overlapping areas and/or gaps in which the game will not render correctly. These are notoriously difficult to find and debug, but can usually be avoided by good snapping habits at this stage.

When creating a Room Marker (or other primitive) with objects selected, the newly-created primitive will match the position, rotation, and bounds of the selection. This can be extremely useful for quickly creating precise Room Markers, as seen above. You can also create "old-fashioned" primitives: simply click the Файл:Toolbar Button Cubic Room.jpg button with nothing selected, then click where you'd like to place your new primitive, then scale as needed.
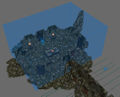
Fig 7.5a: Room marker created by selecting walls at each side of the entry room.
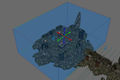
Fig 7.5b: The room marker re-sized to contain the entire entry room.
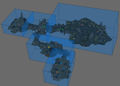
Fig 7.5c: Room markers containing each room of the dungeon.
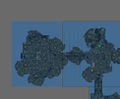
Fig 7.5d: A gap between two room markers in orthographic top down view.
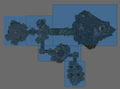
Fig 7.5e: All room markers lined up perfectly in orthographic top down view.


Step 2: Thinking With Portals
We'll create portals everywhere that a) two Room Markers meet and b) the player should be able to see from one room to the next. You can think of them as a sort of user-defined window. Try creating a portal now:
- Select the Room Marker encompassing the first room. Be sure nothing else is selected.
- Position the camera within the room.
- Look through the doorway, similar to a first-person view, as in Fig 7.6a.
- Enter "Portal Mode" by pressing Файл:Jb MainPortalMode.jpg or the Ctrl+P hotkey.
- NOTE: While in portal mode, only portals can be selected.
- Click the "Create Portal" button in the Main Toolbar: Файл:Jb MainPortal.jpg
- Click on the visible blue surface within the doorway
- A dark shape, flush with the edge of your room, will have been created. This is your portal.
- Sometimes the portal will not be created on the correct edge of the room. If this happens, press shift+F to focus the camera on the newly-created portal, then rotate/position it approximately where the two rooms meet. It will be snapped precisely when we join it with the second room, which we'll do shortly.
- Use the scale gizmo to adjust the shape of the portal. It should be as small as possible while completely filling the visible space at the intersection. (Fig 7.6b)
Your portal is positioned correctly, but it's only linked to one of the two rooms. You'll need to link it to the second room before it will work properly.
- Keeping the portal selected, exit Portal Mode. (Файл:Jb MainPortalMode.jpg or Ctrl+P)
- Ctrl+Click to select the second Room Marker.
- You should now have two objects selected: the portal and the unlinked second room.
- Click the "Link Portal To Room" button: Файл:Jb MainPortalLink.jpg
Note the white arrow now drawn from the portal to the center of the newly-linked room. (Fig 7.6c) This visual representation is a good way to spot-check connections in a space. You may also notice a slight change in the scale/position of Room Marker #2. The Linking process will ensure the Room edges and Portal are co-planar, which sometimes corrects small errors. It's still best to try and make sure your rooms are properly snapped ahead of time, however. These auto-adjustments can become problematic when you're working with a room with multiple portals; a correction on one side of the room may create a gap on the other - so it's best not to rely upon them entirely.
-
If you're having trouble selecting a portal, simply go into Portal Mode by selecting a Room Marker and pressing "CTRL+P" or Файл:Jb MainPortalMode.jpg, and select your portal. When in Portal Mode, you can only select portals. This comes in handy when you have a lot of references blocking your view. Keep this in mind if you ever find yourself unable to select anything in the editor - you may have accidentally entered portal mode!
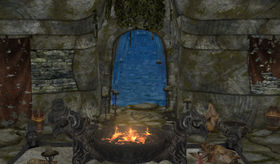
Fig 7.6a: The border between two room markers where we want to create our portal.
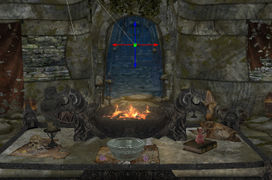
Fig 7.6b: The portal placed at the border and sized to cover the entire connecting area.
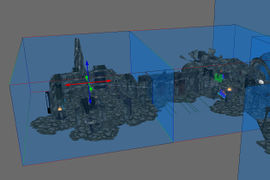
Fig 7.6c: Two rooms linked to a co-planar portal. Note the white arrows.


Step 3: Finishing the Optimization Pass
With Room Markers in place, continue adding portals throughout LokirsTomb until every room is linked. This layout is relatively straightforward, and most problems can be diagnosed by simply running the space in-game and looking for areas where some or all of the objects you'd expect to see pop out of existence, usually because of a gap or overlap where two Room Markers meet.

Some tips for advanced optimization: - Multiple rooms can be joined and treated as a single Room Marker. This allows coverage of irregular room shapes, and is especially useful for areas with several off-grid transitions. To join rooms, select each Room Marker and press the "Join Rooms" button: Файл:Jb RoomMarkerLink.jpg Joined rooms are indicated by a double-ended blue arrow.
- It's possible to get a clean, diagram-style view of your connections. With Portals and Rooms hidden from the View menu, select all objects and double-tap "1" to hide. Then check the View menu to show Portals/Rooms, enter Portal Mode, and select all portals. (Fig 7.7)
- Once connected to Room Markers, a portal cannot be moved. You can break this link with the "Break Portal Link" button: Файл:Jb MainPortalBreakLink.jpg
- Each reference can only belong to a single Room Marker - by default, the one in which its pivot point is contained. If a reference needs to be visible in multiple Rooms, assign it to the "NONE" multibound in its reference properties.
- Skyboxes can be used to set up a Skybox diorama to make your spaces with sky-holes more believable.
Once your level is optimized for maximum performance, you're ready to move on to lighting and FX!
| |
Вернуться в Учебный центр | Следующий учебник | |